Remote MCP Server Guide
ExpenseLM Remote MCP Server – Expense Management Tools via MCP
Last updated: 1/9/2026
Introduction to MCP
Model Context Protocol (MCP) is an emerging standard that allows AI applications to connect with external tools, APIs, and data sources in a structured and secure way. By running an MCP server, you can expose your own functions and data to compatible AI clients, enabling them to call your tools directly in conversations.
The ExpenseLM MCP Server provides AI-accessible tools for expense management, making it easy to integrate expense tracking, reporting, and related operations into AI-powered workflows.
There are 2 types of MCP servers:
Local MCP Server
This type of MCP server use "stdio" as the transport protocol and need to configure the MCP client on how to install the MCP server.
MCP clients that supports local MCP server:
- Claude Desktop (Mac and Windows)
- Perplexity Desktop (Mac)
Remote MCP Server
Remote MCP server use "Streamable HTTP" as the protocol, no need to install package locally. Only need to configure the MCP client about the endpoint URL of the MCP server.
MCP clients that support remote MCP server:
- ChatGPT web (need a Plus plan with developer mode enabled)
- ChatGPT desktop and mobile (config the app on web)
- Claude web (need a Pro plan)
- Claude desktop and mobile (config the connector on web)
- Gemini CLI
ExpenseLM supports both local and remote MCP server. This page is focusing on setting up the remote MCP server.
Prerequisites
Google Account Signin
ExpenseLM remote MCP server use Google OAuth for user authorisation. As a result, you need to use a Google account to sign up for ExpenseLM.
Setup Guide
Configure for ChatGPT Web
- Open your browser and sign in to chatgpt.com with your account
- At the lower left bottom, click your account name and select "Settings"
- Select "Apps" (MCP servers were called Apps in ChatGPT)
- Click on "Advanced settings"
- Toggle on "Developer Mode"
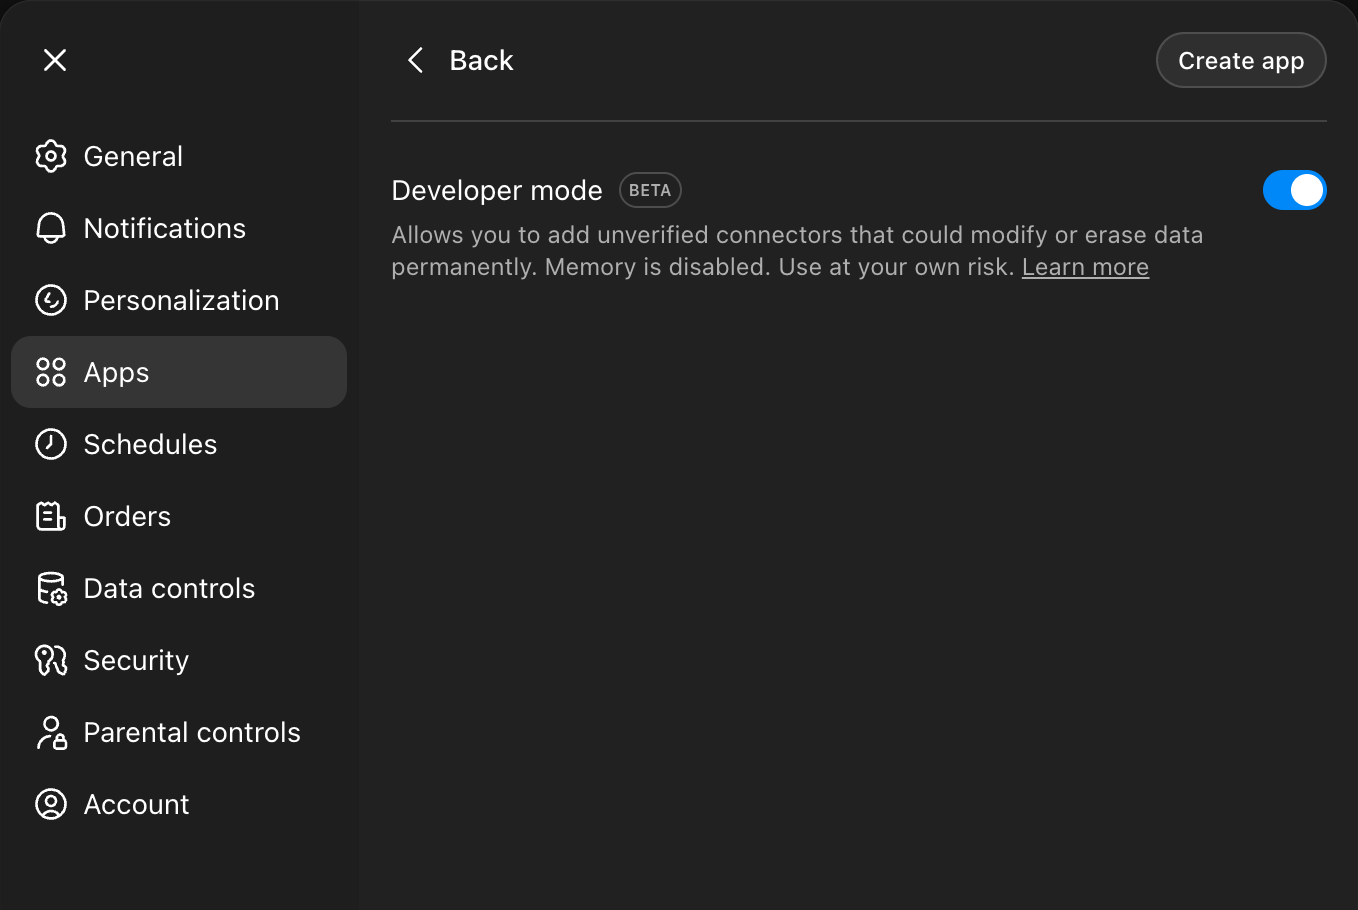
- Click "Back" to the Apps settings page
- Click "Create app" to create an app for ExpenseLM remote MCP server
- In the "New App" dialog, enter the following information:
- Name: ExpenseLM
- MCP Server URL: https://mcp.expenselm.ai/mcp
- Authentication: OAuth
- Option "I understand and want to continue": check
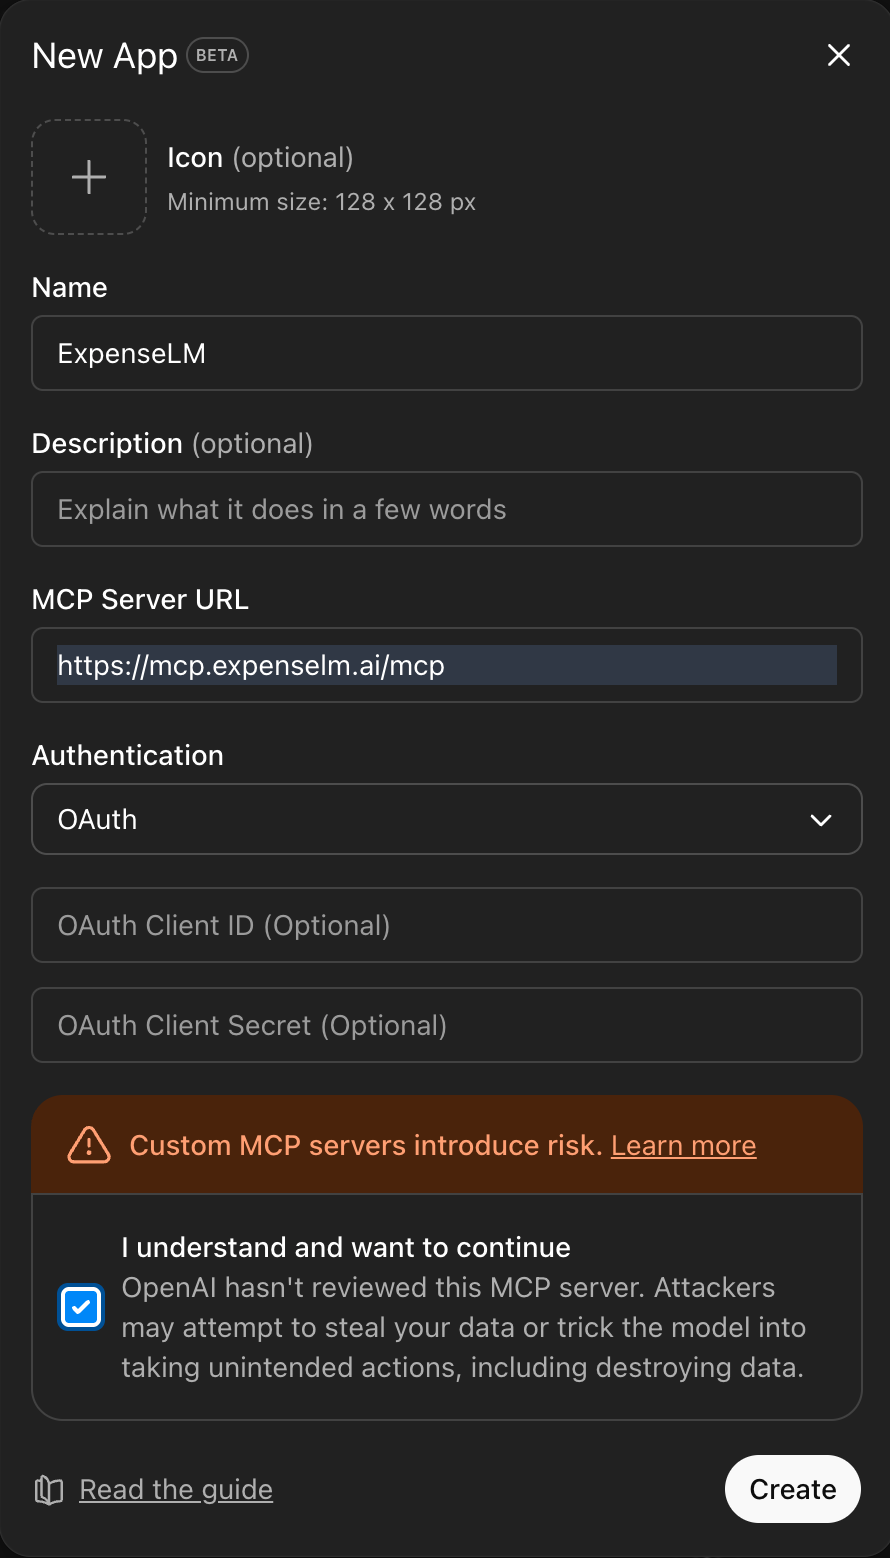
- Click "Create"
- Once created, you will see ExpenseLM in the "Apps" page. Click "Connect" to connect ChatGPT to ExpenseLM. If everything runs well, you should see a pop-up window that ask you to sign in with your Google Account. Sign in with your Google Account that you use to sign up ExpenseLM.
Verification in ChatGPT Web
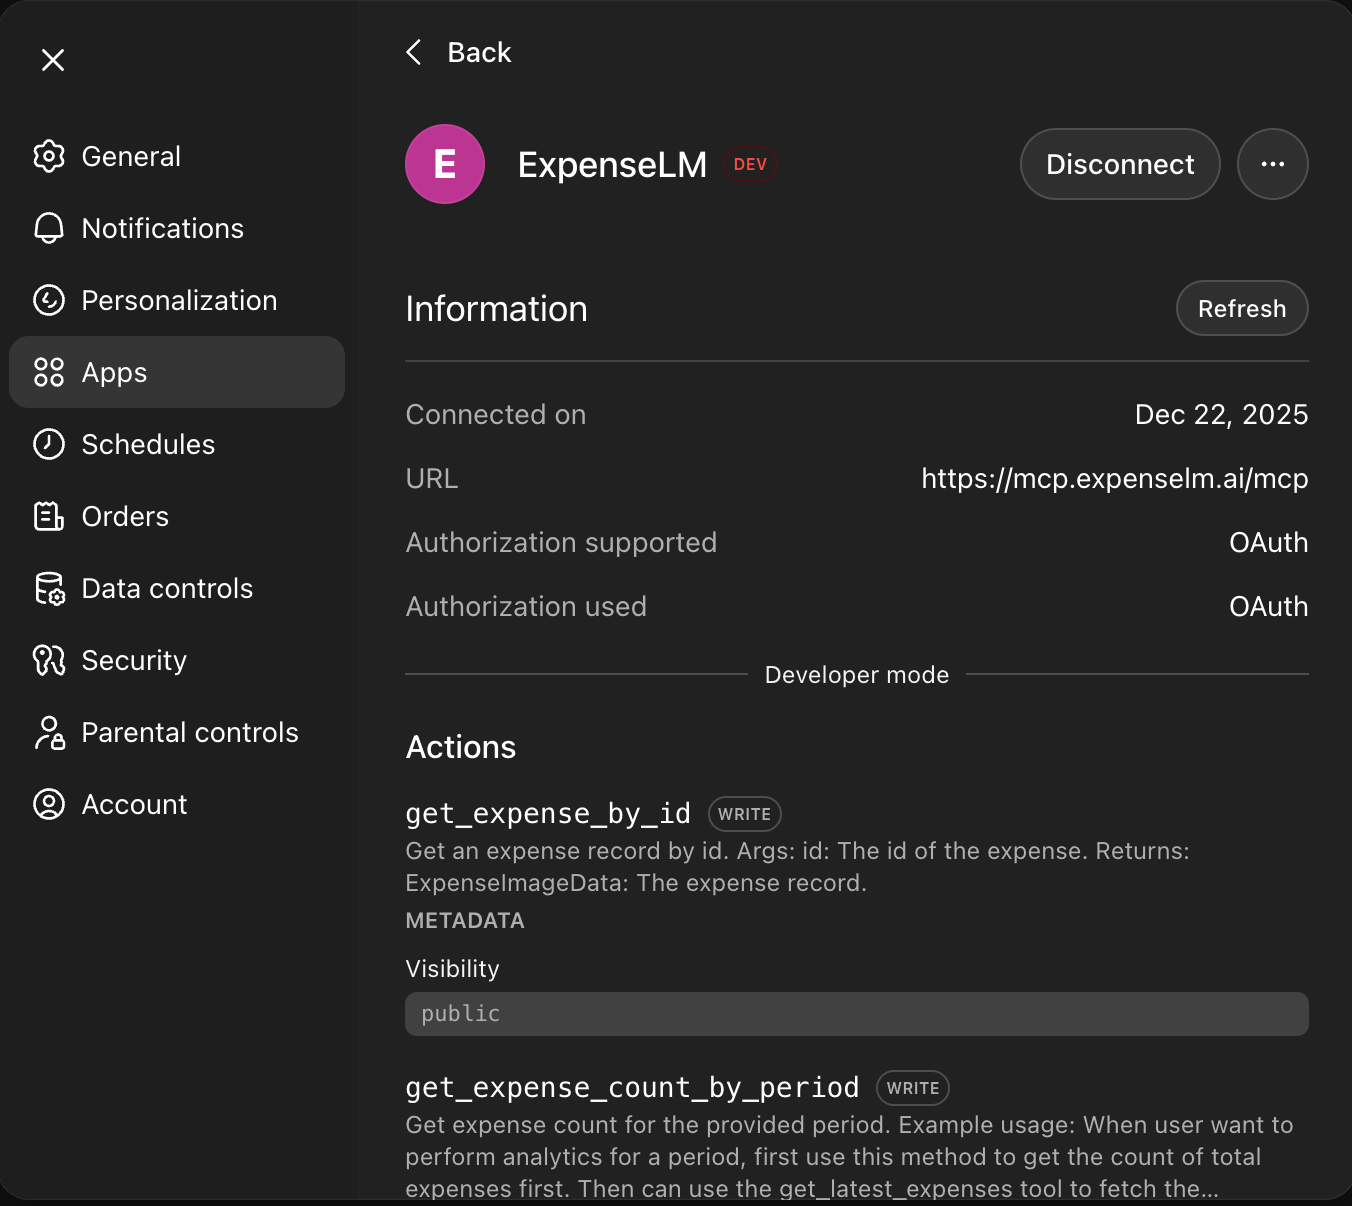
- In "Settings" -> "Apps", you should see ExpenseLM in the "Enabled apps"

- Click into ExpenseLM, and you should see the detailed information
Testing in ChatGPT Web
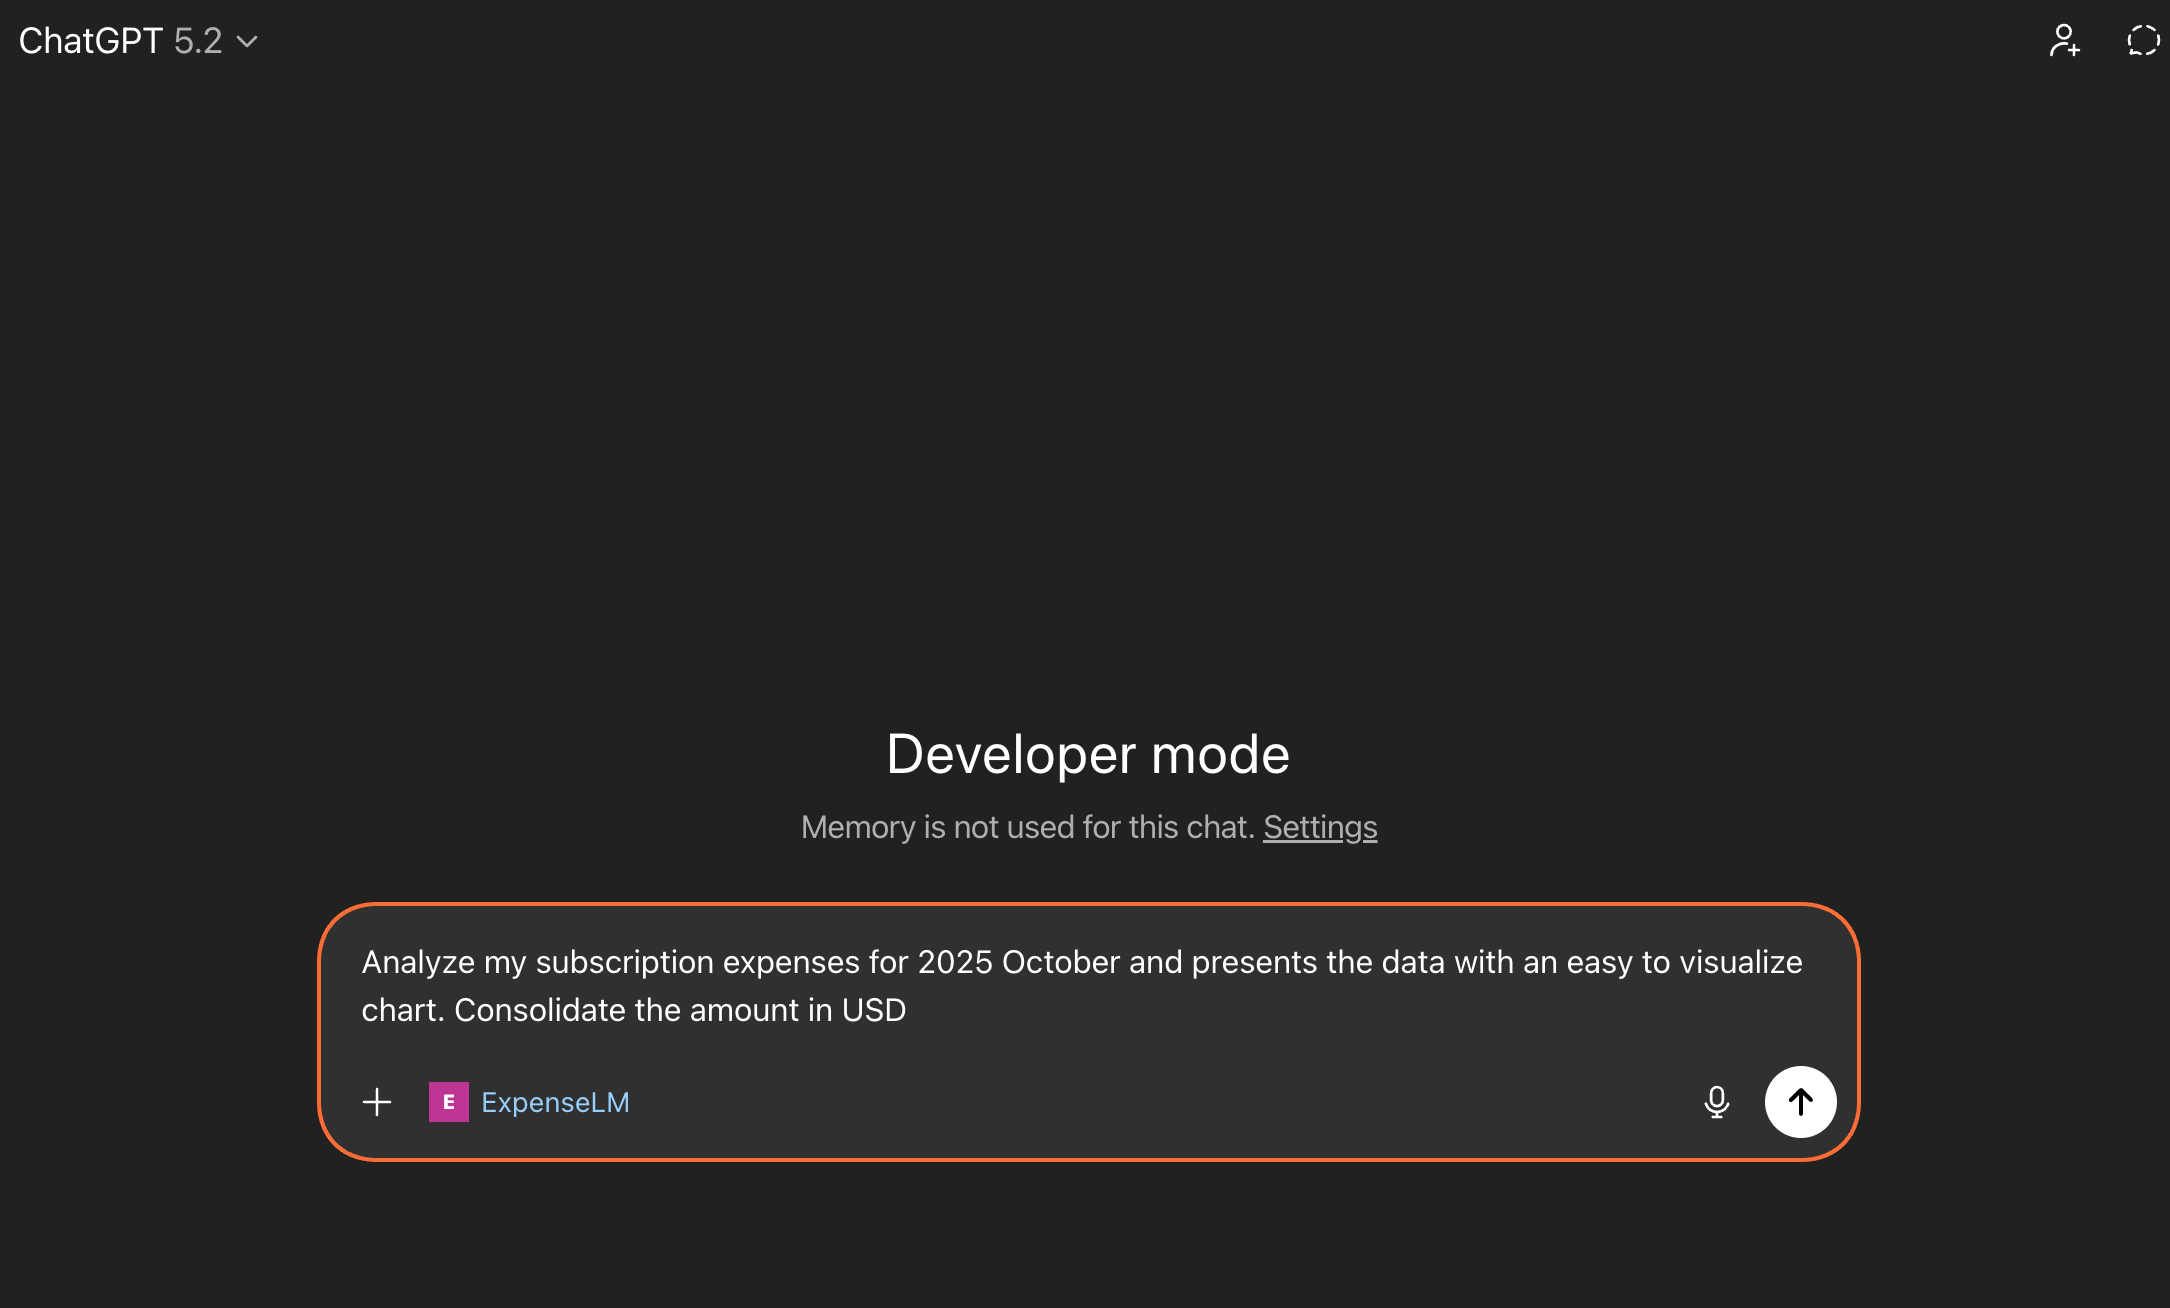
To test the ExpenseLM remote MCP server, in the chat interface, add the ExpenseLM tool:
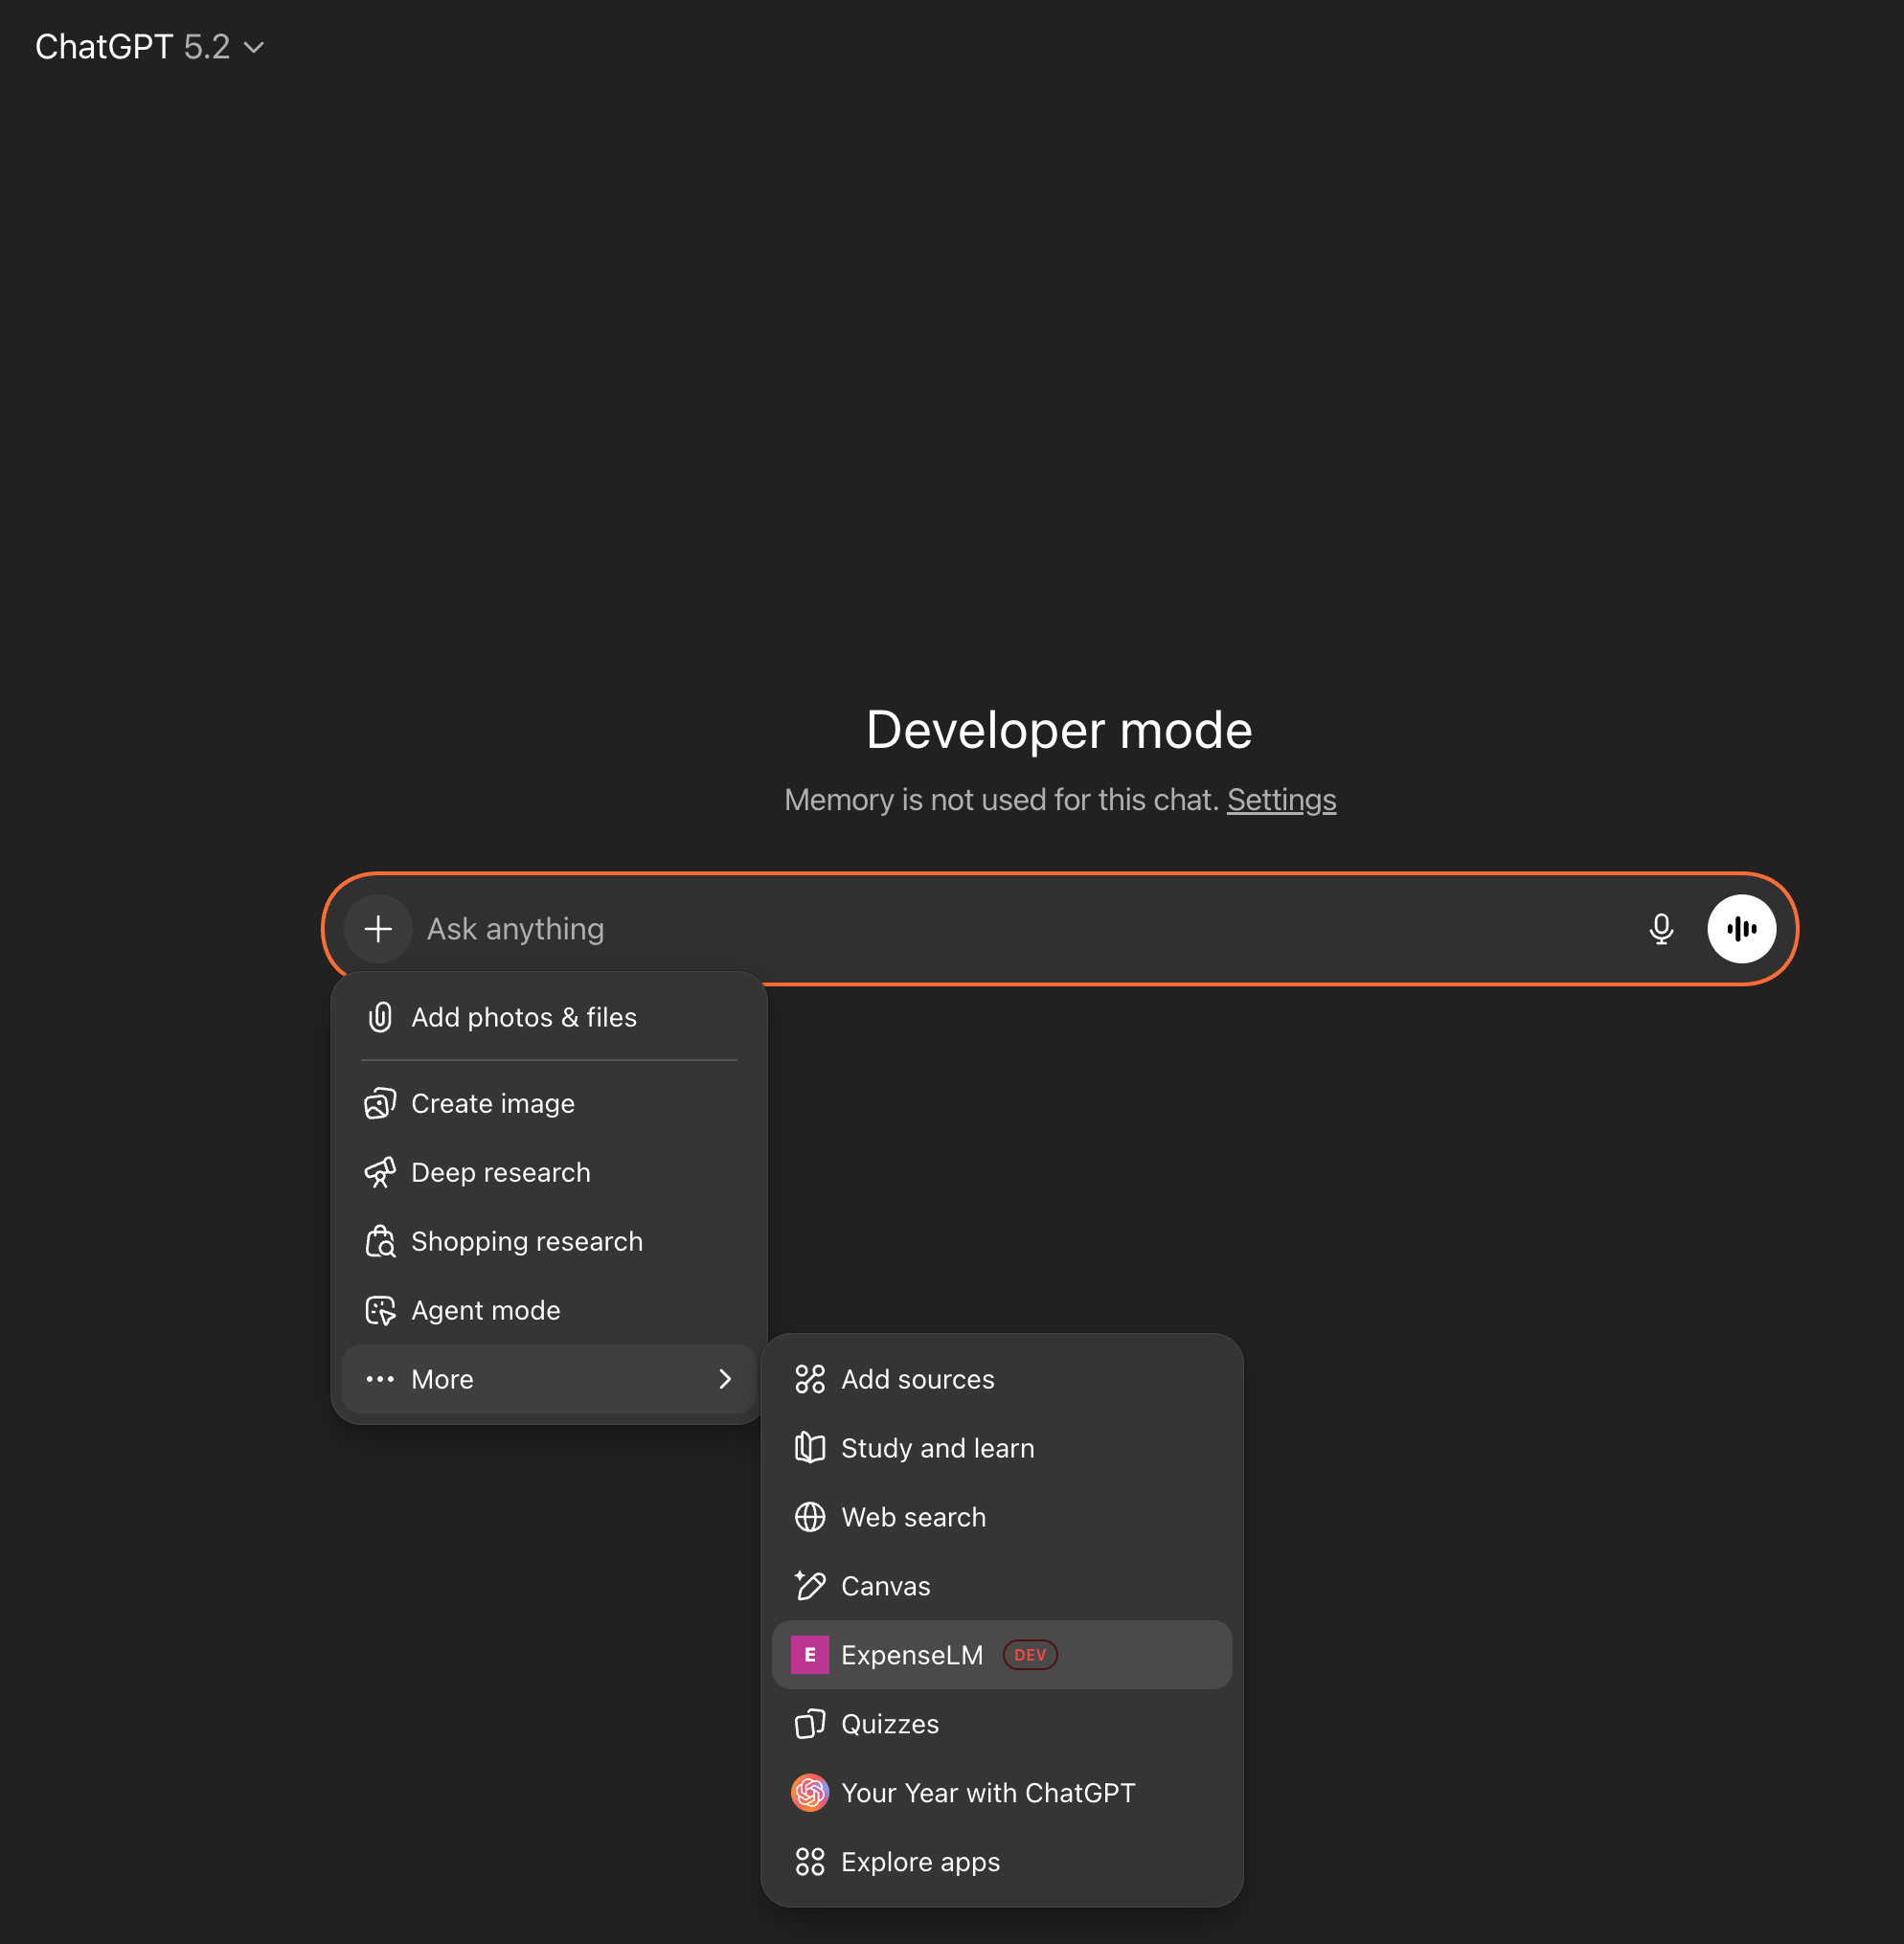
Then ask questions about your expense.
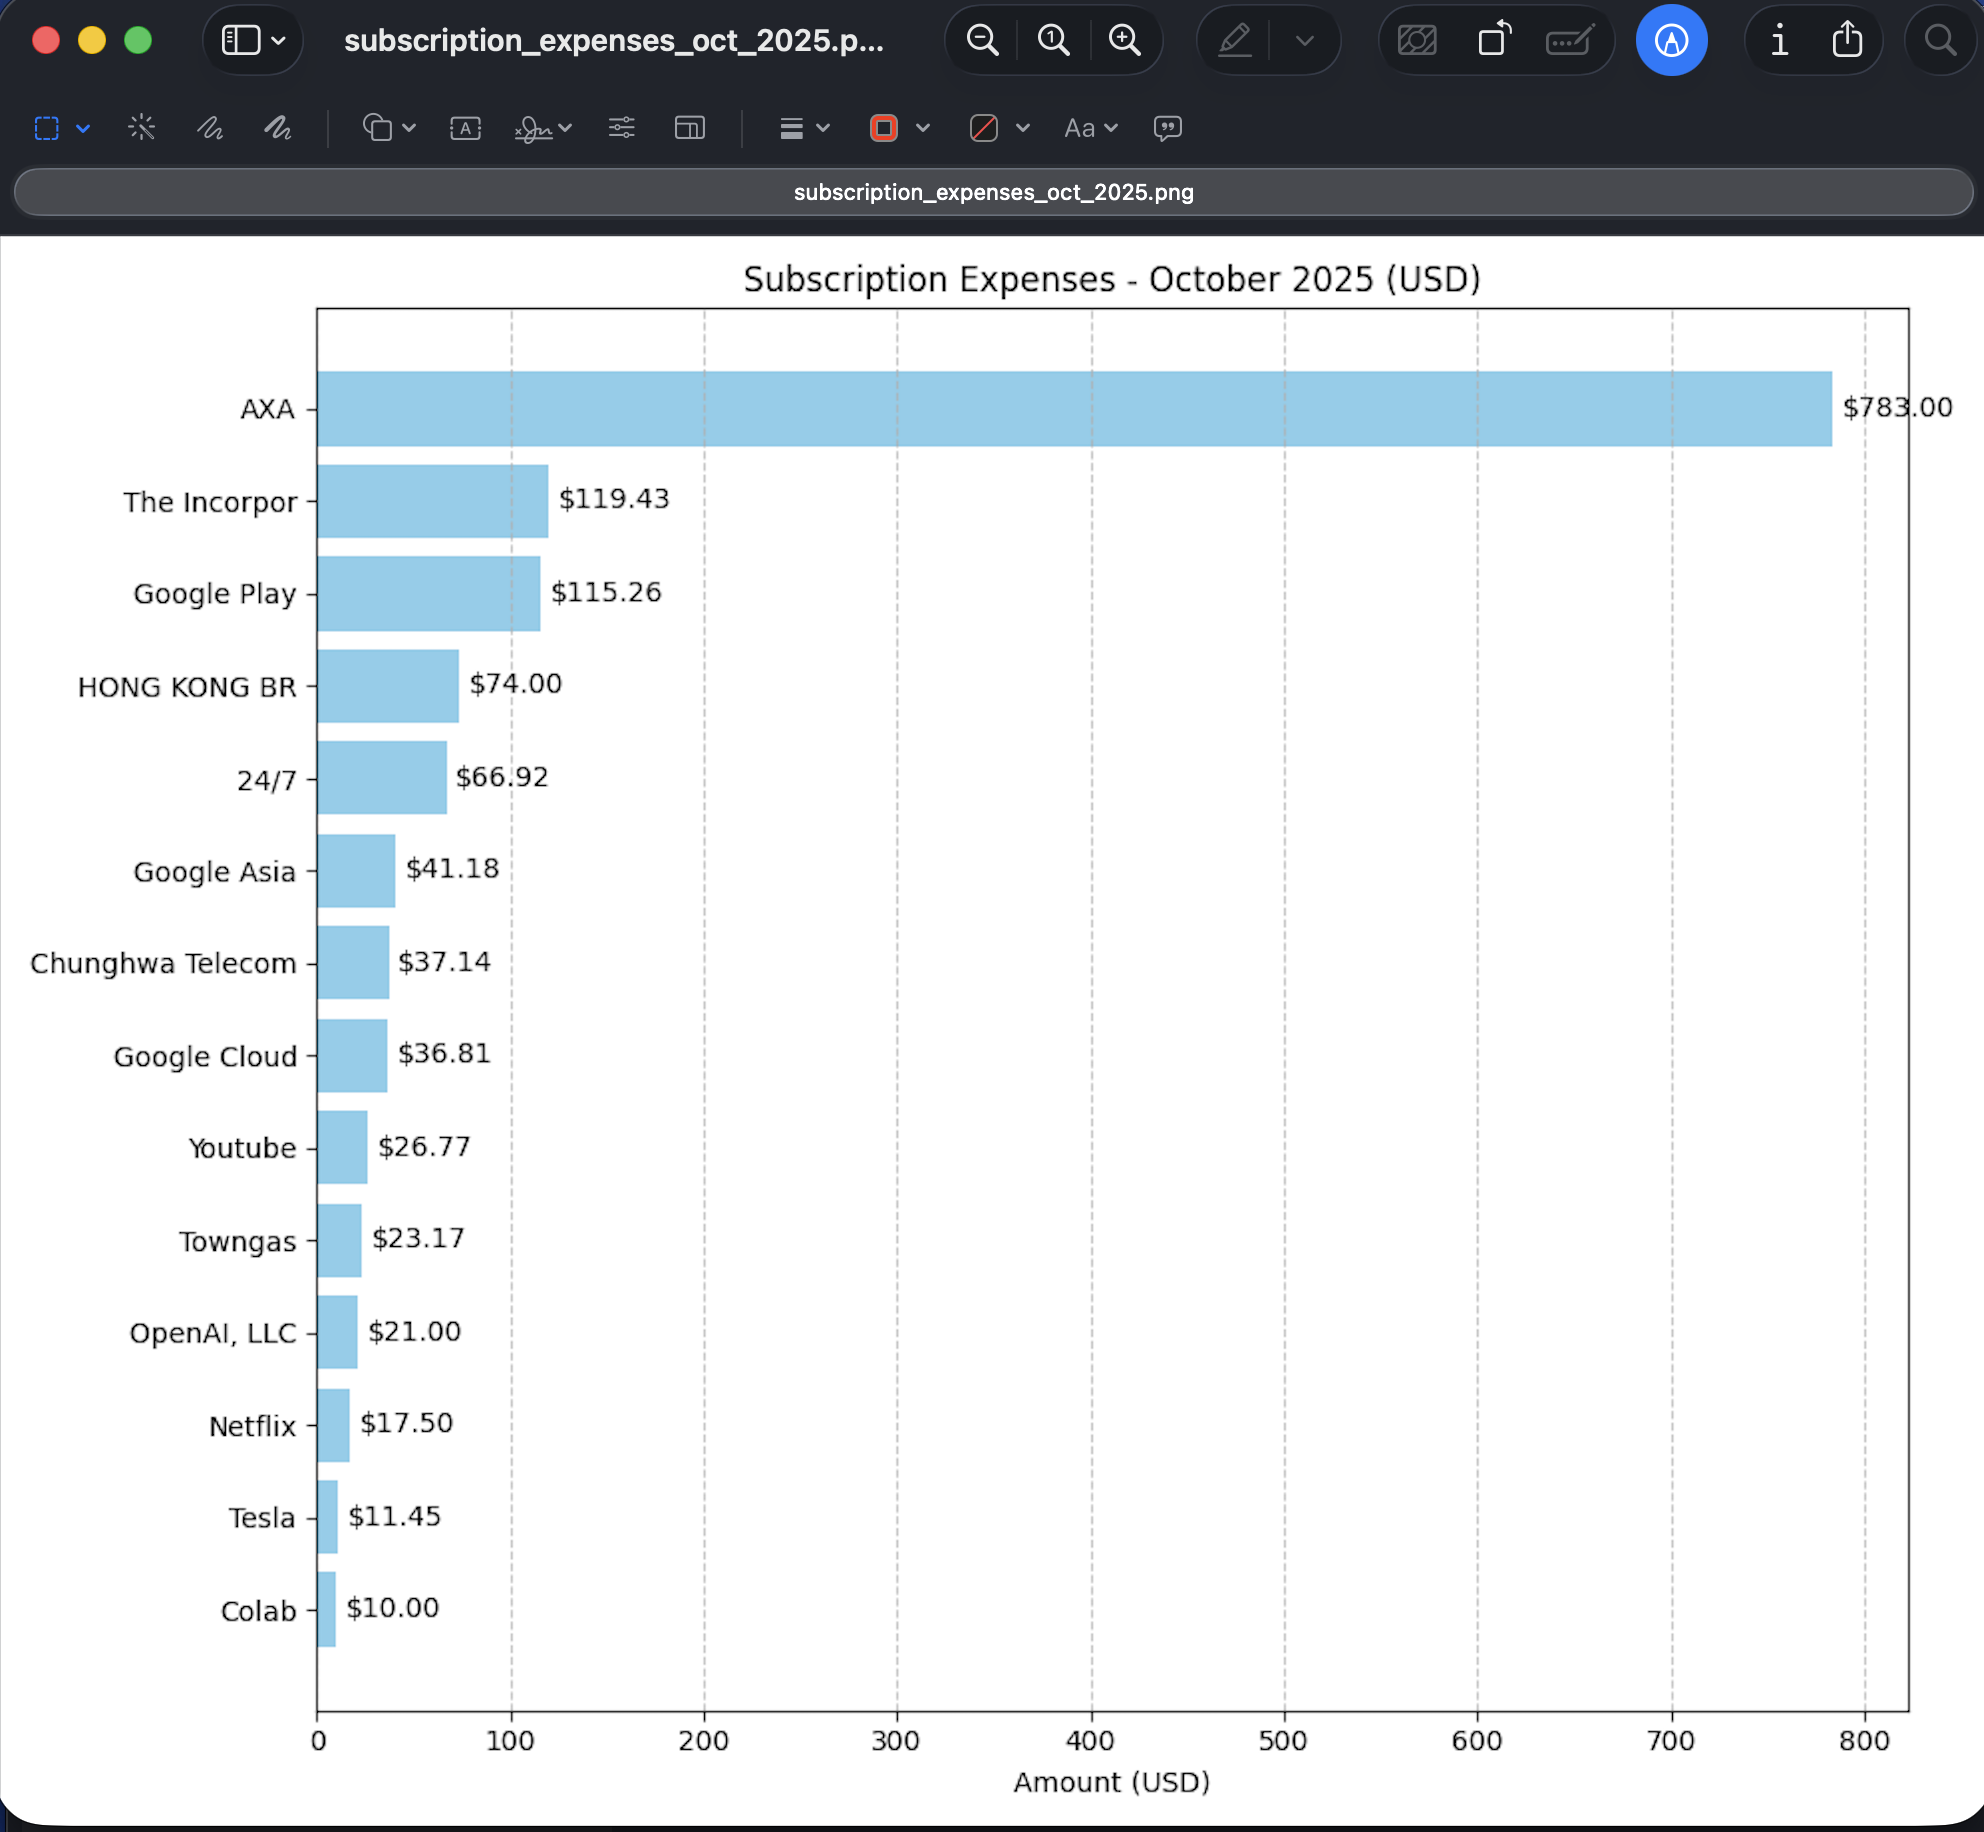
Sample question: Analyze my subscription expenses for 2025 October and presents the data with an easy to visualize chart. Consolidate the amount in USD.
You will be asked for permission on using ExpenseLM tools. Just approve them to proceed. Finally you should be able to see ChatGPT response with your data in ExpenseLM.
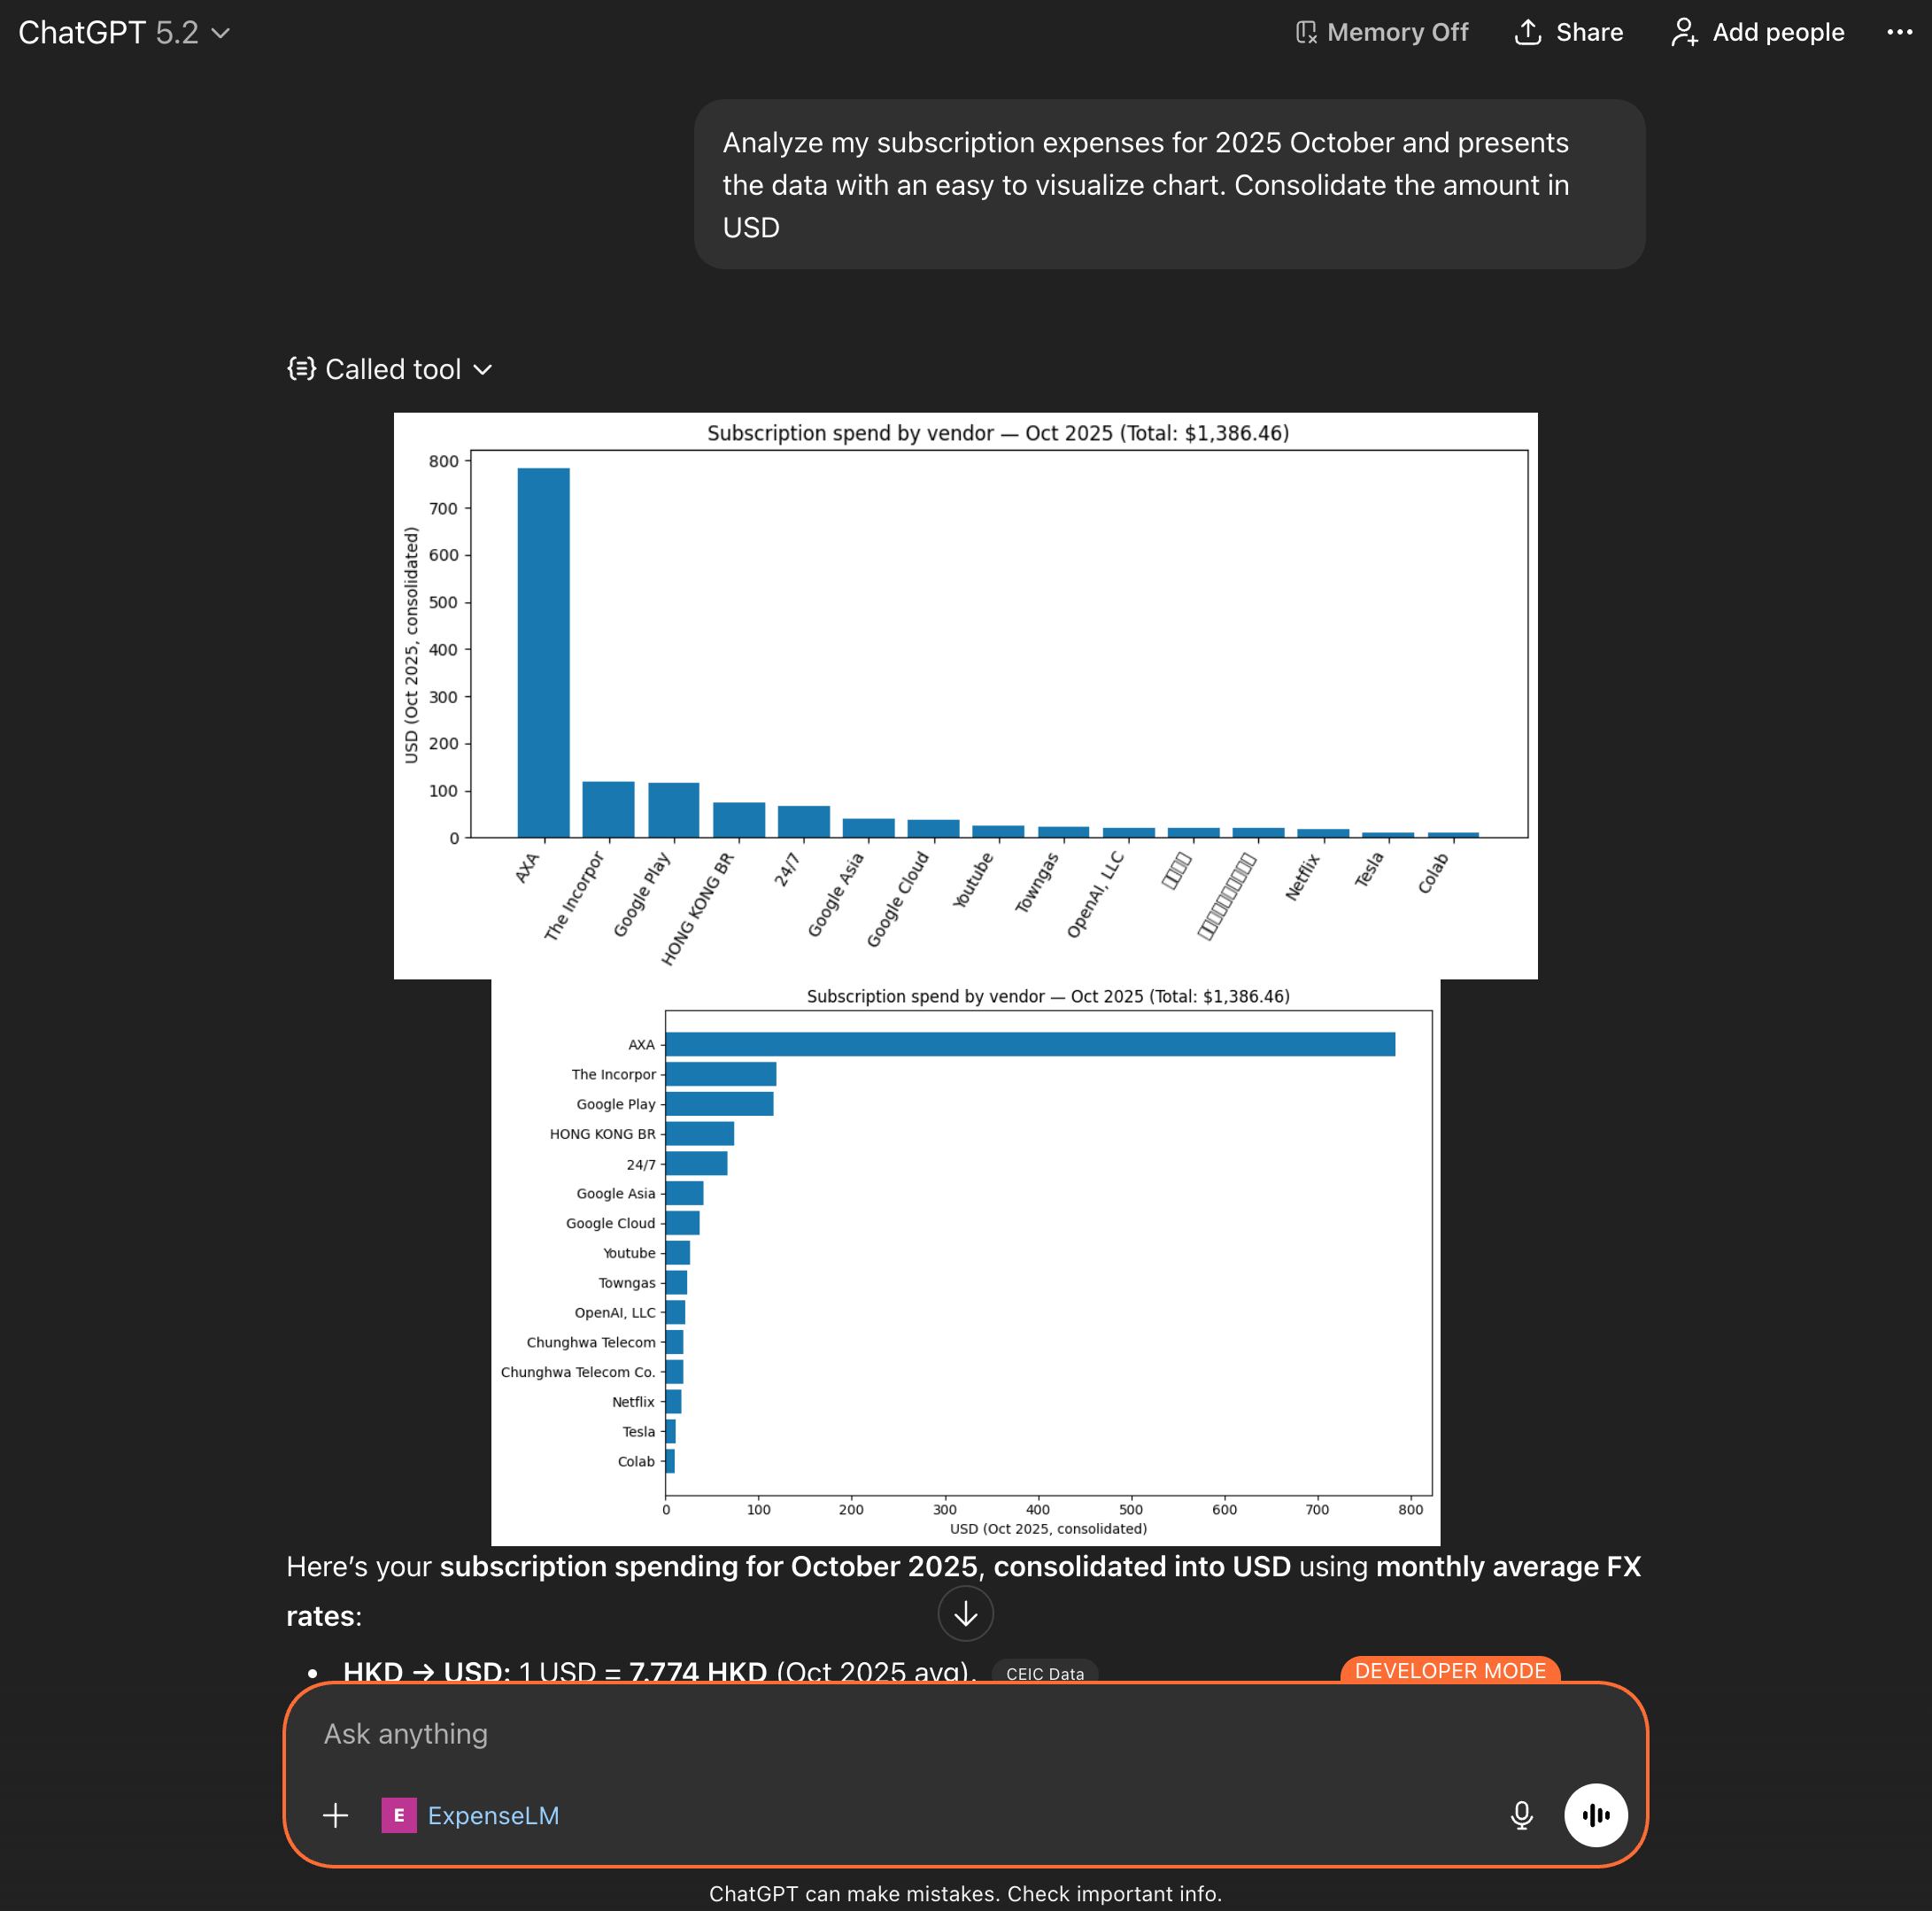
Note: ChatGPT has some problem in displaying non-English characters. In the second chart it translate them into English.
Configure for Claude Web
- Open your browser and sign in to claude.ai with your account
- At the lower left bottom, click your account name and select "Settings"
- Select "Connectors"
- Click "Add custom connector"
- In the "Add custom connector" dialog, enter the following information:
- Name: ExpenseLM
- Remote MCP URL: https://mcp.expenselm.ai/mcp
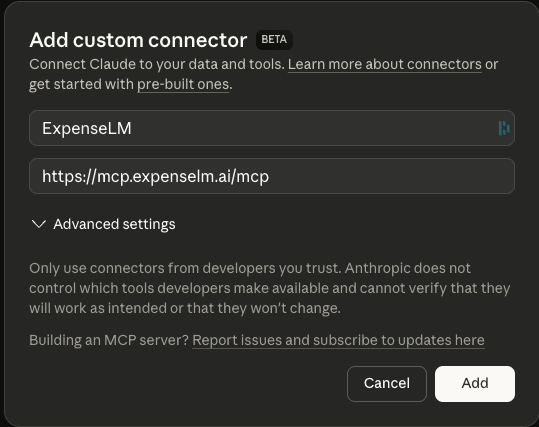
- Click "Add" to add the connector
- Back to "Connectors" in "Settings" page, and you should see the ExpenseLM connector was added. Click "Connect" to connect Claude to ExpenseLM. If everything runs well, you should see a pop-up window that ask you to sign in with your Google Account. Sign in with your Google Account that you use to sign up ExpenseLM.
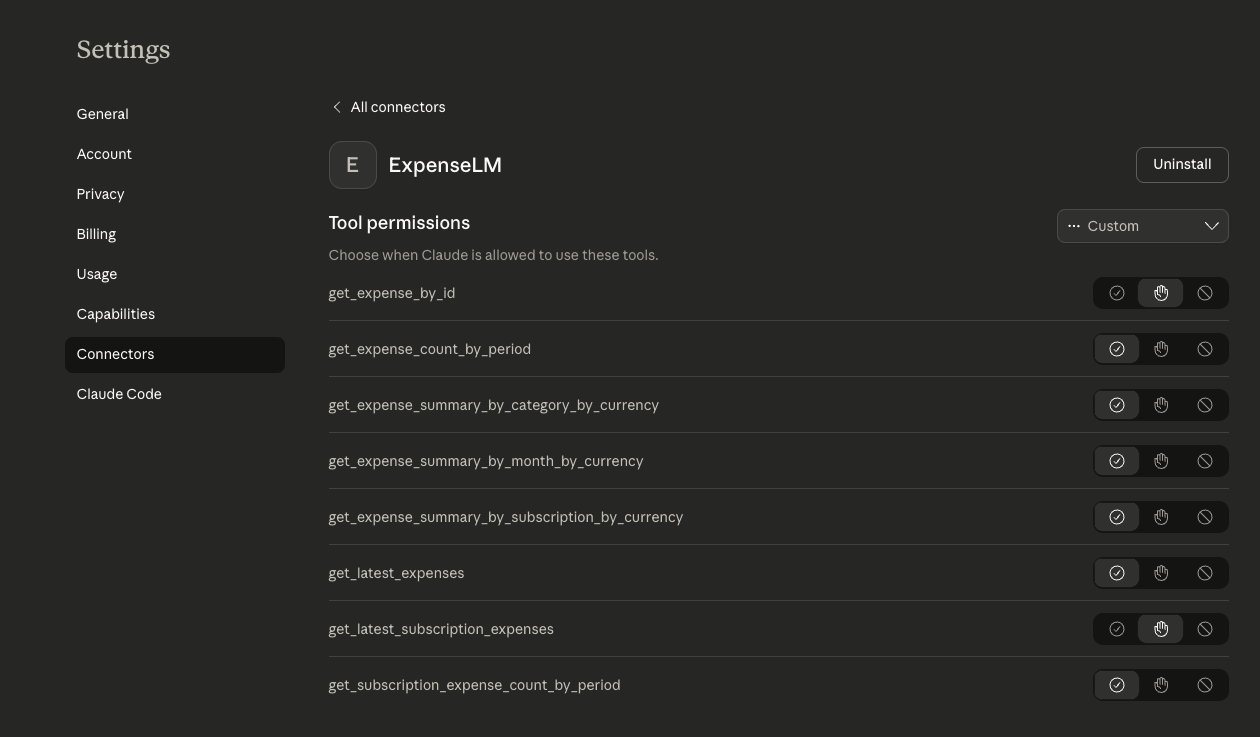
Verification in Claude Web
To verify the ExpenseLM MCP server, in "Settings" -> "Connectors" page, click the "Connect" button next to ExpenseLM. You should see the tools available like the below screenshot.
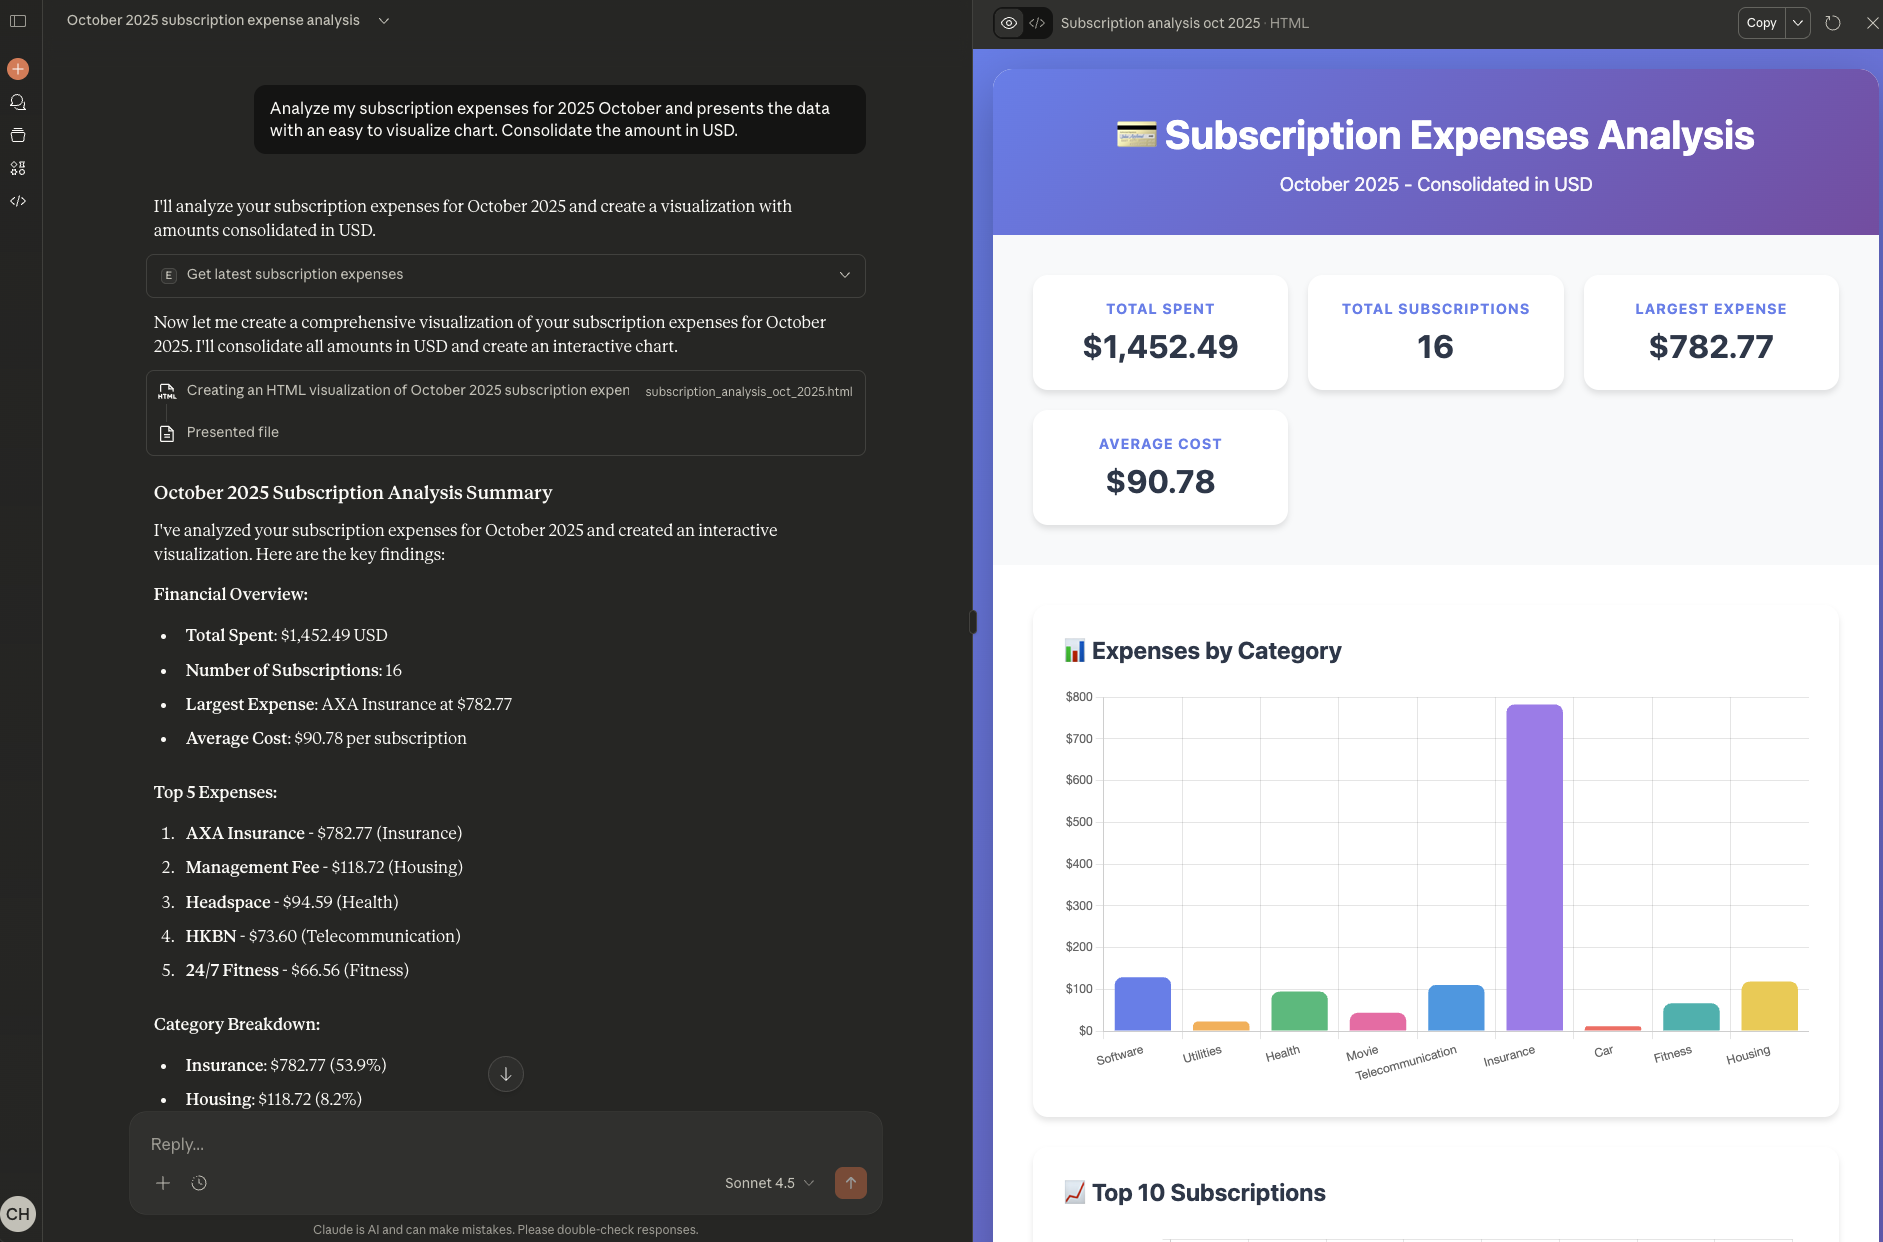
Testing in Claude Web
In Claude web, starts a new chat and enter your expense related question.
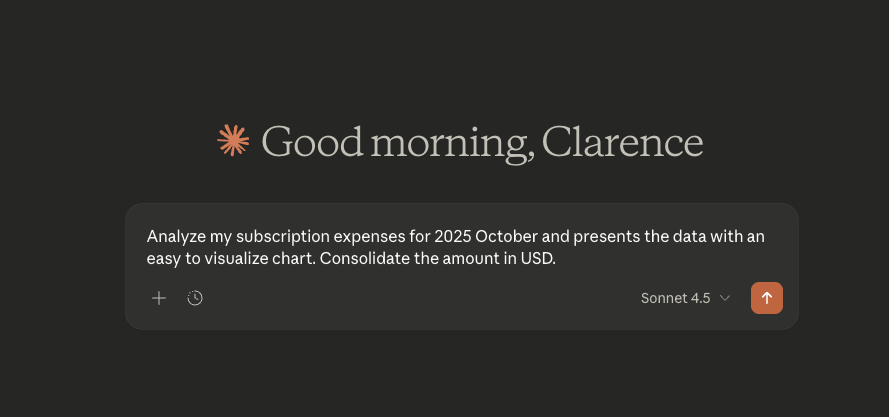
You will be asked for permission on using ExpenseLM tools. Just approve them to proceed. Finally you should be able to see Claude response with your data in ExpenseLM.
Configure for Gemini CLI
For Gemini, it's a bit invloved. As Gemini app nor web supports remote MCP server, we will use Gemini CLI.
Install Gemini CLI
Follow the official doc here for installing Gemini CLI in your machine.
Configure MCP server in Gemini settings file
Gemini CLI's settings file is stored in the following location:
- Mac: /Users/[username]/.gemini/settings.json (create one if not exists)
Use your favorite editor to open the file and fill in the following content.
Settings.json:
{
  "ide": {
    "hasSeenNudge": true,
    "enabled": true
  },
  "security": {
    "auth": {
      "selectedType": "oauth-personal"
    }
  },
  "ui": {
    "theme": "Default"
  },
  "general": {
    "previewFeatures": true
  },
  "mcpServers": {
    "expenselm": {
      "url": "https://mcp.expenselm.ai/mcp"
    }
  }
}
Note the "expenselm" entry in the section "mcpServers".
Connect to ExpenseLM Remote MCP server in Gemini CLI
- Open a terminal prompt
- Create a folder and change directory into it, so Gemini's output will be stored in this folder
- Type "gemini" to enter Gemini CLI
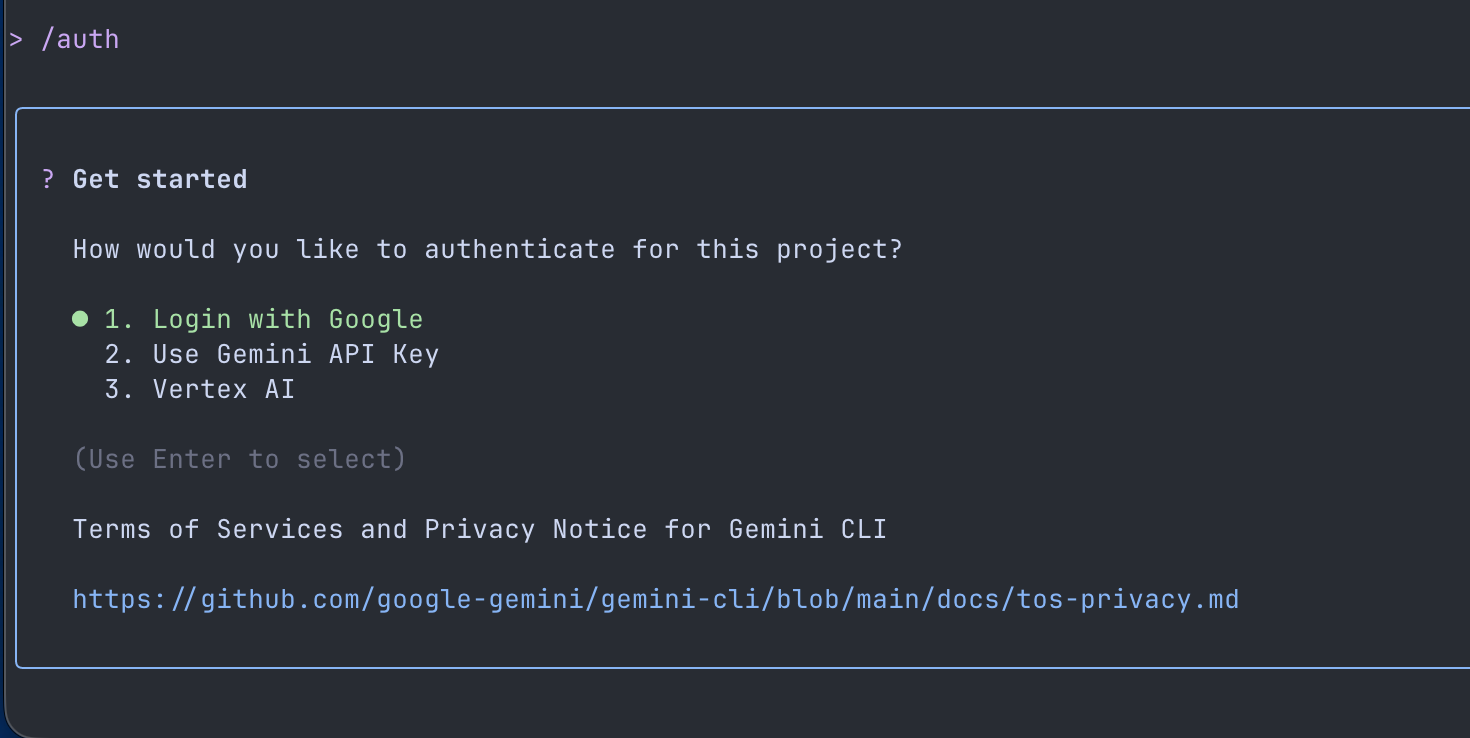
- If you are using it for the first time, you need to login with your Google account
- Type "/auth" and choose "Login with Google"
Connect to ExpenseLM MCP Server
Before you can use ExpenseLM, you need to authenticate to ExpenseLM server.
- Enter "/mcp auth expenselm"
- Login with your Google account you used to sign up ExpenseLM
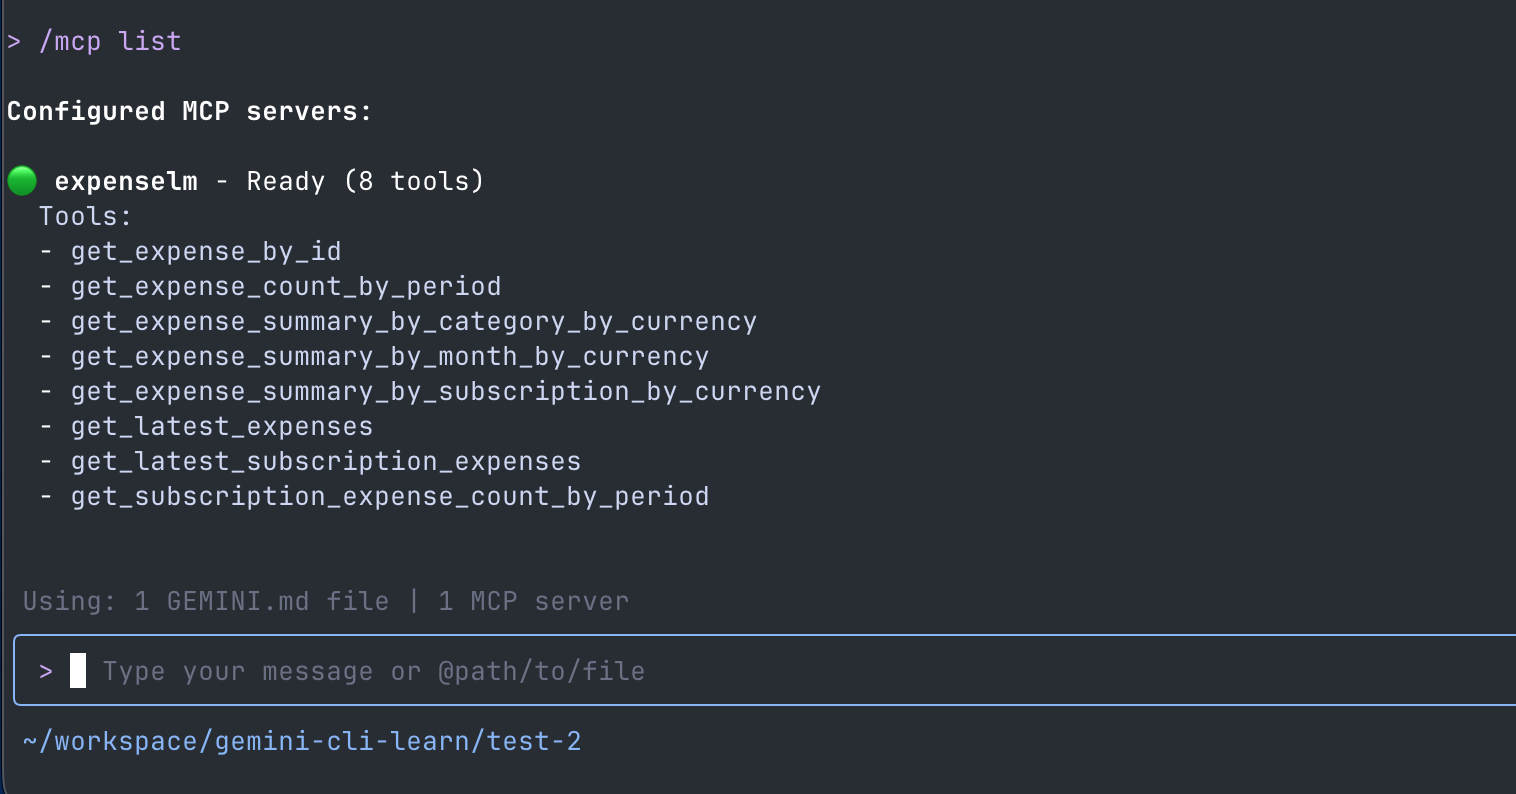
Verification on Gemini CLI
To verify the connection of ExpenseLM, enter the command "/mcp list", and you should see the tools in the output.
Testing on Gemini CLI
To test Gemini CLI with ExpenseLM, enter your expense related question.
Sample question: Analyze my subscription expenses for 2025 October and presents the data with an easy to visualize chart. Consolidate the amount in USD. Save the chart in a file.
You will be asked for permission on using ExpenseLM tools. Just approve them to proceed. Finally you should be able to see Claude response with your data in ExpenseLM.

Upon completion, Gemini will told you that it had saved the output in a file in your working folder. Open it to see the analysis results.